As a member, how can I create an Import Summary Form (a.k.a. Bill of Entry)?
Section 1: Prerequisites
A) Login
User must be logged in as a Member at https://sawntimber.capexil.org
B) Completing Company Details
A user must verify and complete their company details.
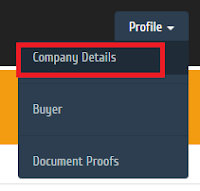
- Go to Top Menu > Profile.
- Click on the sub-menu 'Company Details', as shown below.
- A page would open where the company details mentioned at the time of registration will be seen. If there is a change in the information, it must be changed before applying for the Import Summary form.
- A user must complete all the mandatory fields marked with the * asterisk, all other fields are optional.

C) Uploading of necessary documents
- The user must ensure that all document pertaining to the Import Summary Form are uploaded in this section. To learn how to upload documents - click on this link: How to upload document proofs?
- Once the documents are uploaded, the user will be required to digitally attach those documents while filling the Import Summary form. The steps on how to attach the uploaded documents digitally will be taken up in a later section.
Section 2: How to create an Import Summary Form
After the user has properly finished the prerequisite section, following steps must be done:
- Go to top menu > Forms > Import Summary Form.
- A new listing page opens where all the import summary forms are shown. Please note initially the table would not show up any Import summary, it would simply say, 'No Import summary forms found'.
- Just below this table, there is a blue colored button, 'Add new Import Summary Form.'
- Clicking on that button would open a new page allowing the user to enter mandatory fields.
- Most fields are self-explanatory. However, in the later section, it is explained what fields require special attention.
Section 3: Important fields & intuitive information on the Import Summary form
A] System calculated Statistics: The table below show the values after the user would save the application/form details.
B] Fields that would impact the System Calculated Statistics table:
ii) Usable Export Quantity in CBM: Value in this field would get subtracted from the Allowed Import Quantity, and the Balance Export Quantity would be shown. Continuing the above example,. if the user enters 400.00 CBM, then the Balance Export Quantity would be 200.00 CBM.
iii) Invoice Value, Freight Charges, Insurance Charge, HSS Load Rate: All these values add up to be the CIF value in the table. Eg. continuing with the same example above, if we consider 100.00 as a value for each of the fields, the Total CIF value would be 400.00 as shown below:
iv) Rate Per CBM value is calculated by the formula: Total CIF value divided by Allowable Export Quantity.
ii) After the information is successfully saved, verify if your import summary form appears in the list. Go to top Menu > Forms > Import Summary Form, the table list that appears must the user's recently saved import form. It should be at the top must position in the table.
iii) Once it appears, click on the Open button on the same row where the import summary form appears.
iv) After opening the form, the user must then click on Apply button to apply for the import summary form.
C] Attaching document proof to the Import Summary Form
After the user has filled all the mandatory information in the Import Summary Form, it is mandatory to attach one or more document proofs with the application. As shown in the screenshot below,
There are instructions below the field itself, in the form of help text, as to how one or more document proofs can be attached to the Import Summary Form.
i) Once all the information is added, and documents proofs are attached, the user must click on Save Details button at the bottom of the form.
D] Finally, saving and applying
ii) After the information is successfully saved, verify if your import summary form appears in the list. Go to top Menu > Forms > Import Summary Form, the table list that appears must the user's recently saved import form. It should be at the top must position in the table.
iii) Once it appears, click on the Open button on the same row where the import summary form appears.
iv) After opening the form, the user must then click on Apply button to apply for the import summary form.


Comments
Post a Comment